
| 1. | Turn off air ride system (switch is located in trunk on LH side of compartment). | ||||||||||||||
| 2. | Place vehicle on hoist. | ||||||||||||||
| 3. | Windshield Wiper Motor Module Assembly Removal:
|
|
| h. | Remove seven (7) retaining screws and washers and cowl top extension (Figure 1). |
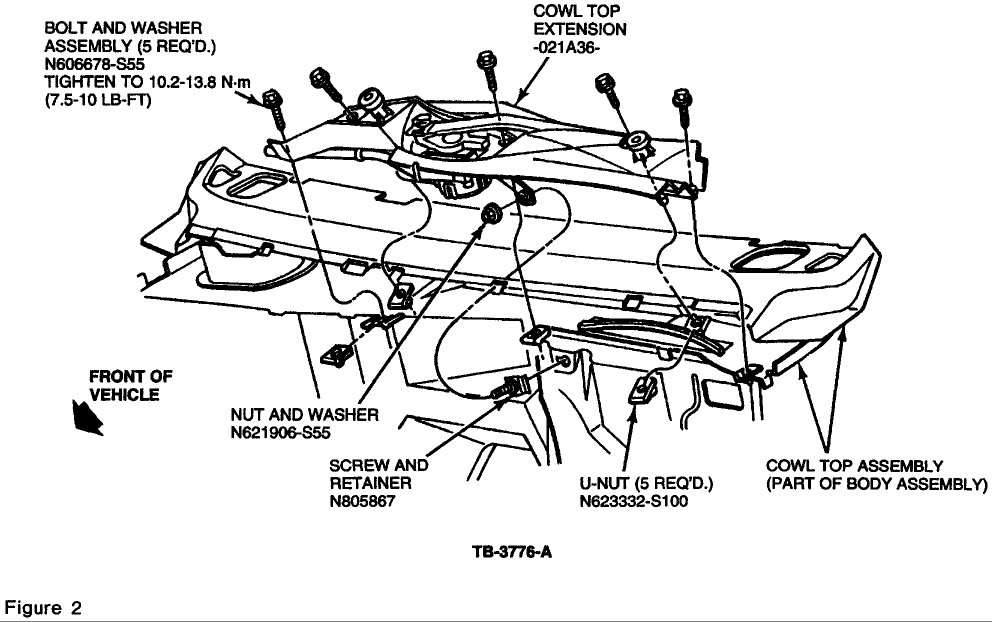 |
| i. | Remove five (5) retaining bolt/washer assemblies and one (1) nut from the wiper module (Figure 2). |
| j. | Disconnect the two (2) wiring connectors from the motor. |
| k. | Lift module slightly to disengage the support bracket from the dash panel mounting stud. |
| l. | Move the module sideways about 2" (50 mm) toward the passenger side and remove the module. |
| 4. | Preparation for Cylinder Front Cover Removal: |
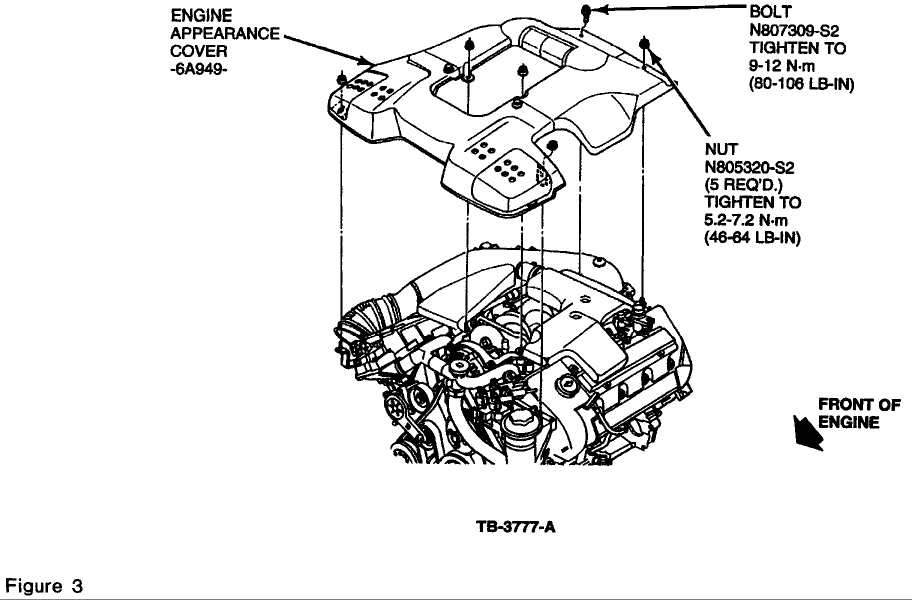 |
| a. | Remove engine appearance cover (Figure 3). |
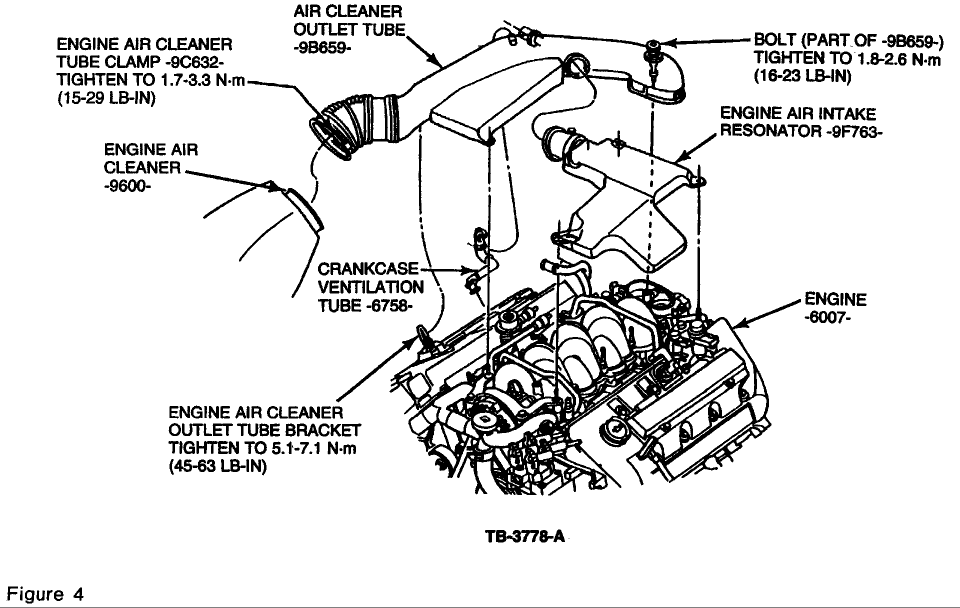 |
| b. | Remove engine air cleaner outlet tube and resonator assembly (Figure 4). |
| c. | Disconnect throttle cables from bracket on engine. |
| d. | Loosen water pump pulley bolts. |
| e. | Remove accessory drive belt. |
| f. | Drain cooling system and remove the coolant bypass hose and upper radiator hose from the coolant crossover tube. |
| g. | Remove water pump pulley and lower water pump-to-cylinder block retaining bolt for front cover removal clearance. |
| h. | Remove two (2) bolts and one (1) stud retaining power steering pump reservoir to LH coil bracket. |
| i. | Remove radiator cooling fan shroud. |
| j. | Remove coolant overflow hose from coolant reservoir. |
| k. | Raise vehicle on hoist. |
| l. | Using Steering Pump Pulley Remover (T69L-10300-B), remove power steering pump pulley to provide access to the front lower pump mounting bolt. |
| m. | Remove bolts retaining power steering pump to engine block and cylinder front cover and move pump out of the way. |
| n. | Remove four (4) bolts retaining the oil pan to the front cover. |
| o. | Remove crankshaft damper retaining bolt and washer from crankshaft. |
| p. | Lower vehicle. |
| q. | Using Front Damper Puller (T58P-6316-D), remove the damper pulley from the crankshaft. |
| r. | Remove the strut appearance cover from LH fender apron next to the power distribution box. |
| s. | Remove bolt retaining the main harness to the front engine cover. |
| t. | Loosen the power distribution box and bracket. |
| u. | Leaving the brake lines attached, remove three (3) nuts securing the brake master cylinder and wire harness bracket to the vacuum brake booster. Move master cylinder away from the booster and secure off to the side, away from the LH cam cover. |
| v. | Remove two (2) bolts retaining the main harness to the lower portion of the cylinder front cover. |
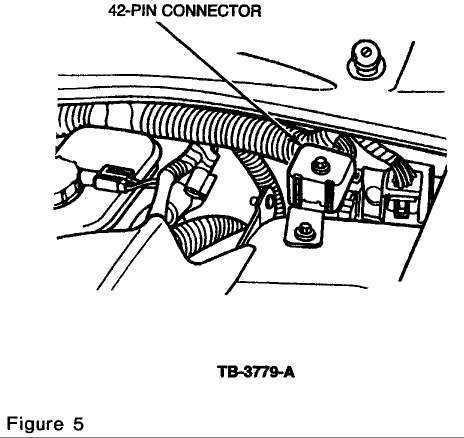 |
| w. | Disconnect the fuel injector wiring harness at the 42-pin connector (Figure 5). |
| x. | Disconnect the vacuum hose from the brake vacuum booster. |
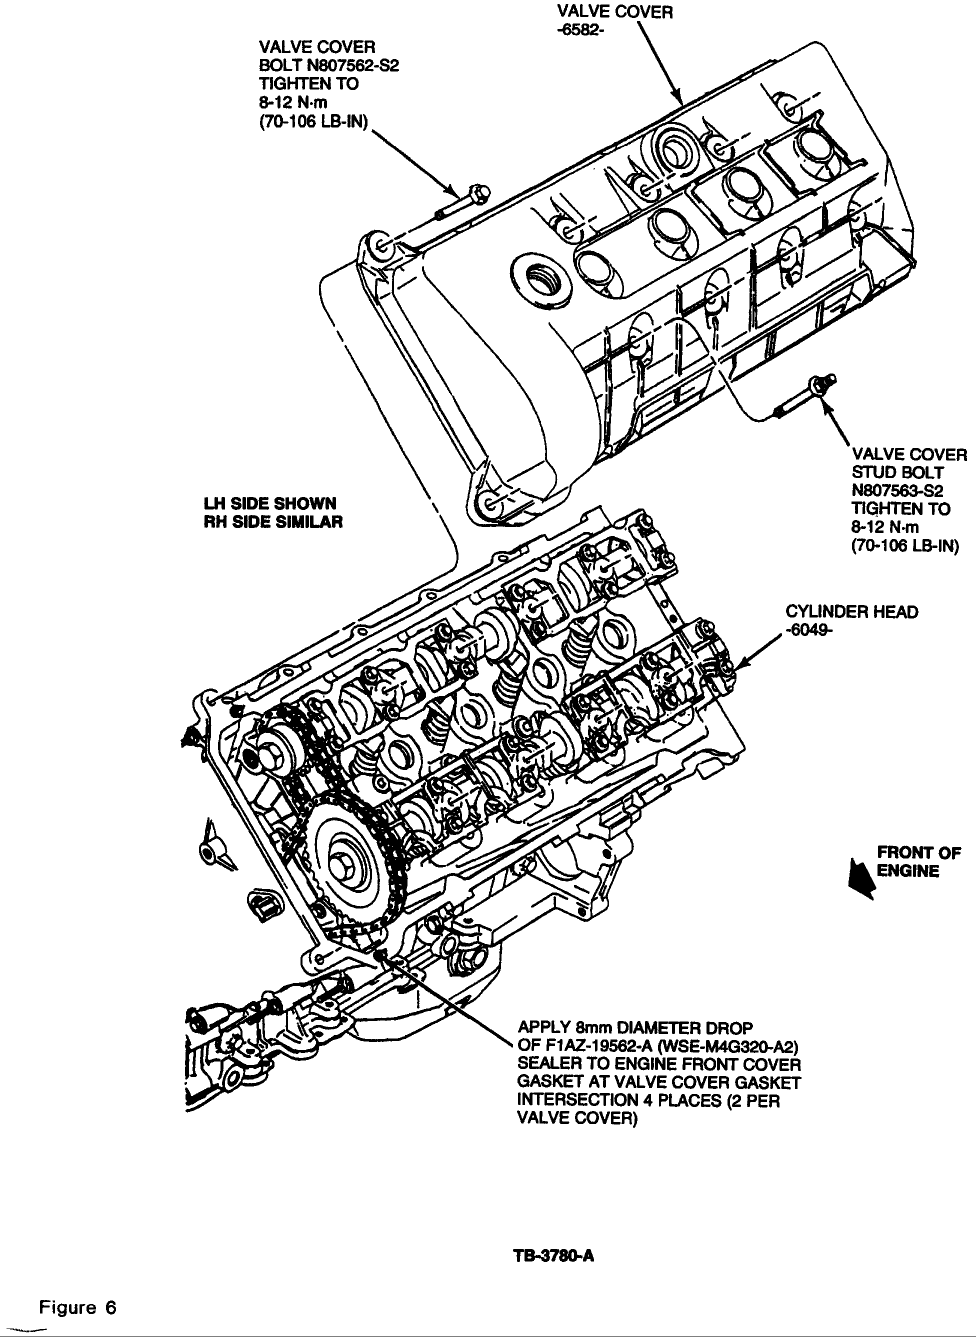 |
| 5. | Cam Cover Removal, LH Side (Figure 6):
|
| 6. | Cam Cover Removal, RH Side (Figure 6)
|
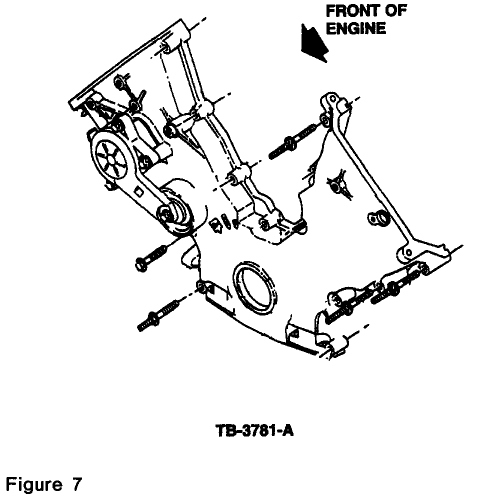 |
| 7. | Engine Front Cover Removal (Figure 7):
| ||||||||||||||
| 8. | Preparation Steps for Secondary Tensioner Replacement:
| ||||||||||||||
| 9. | LH Secondary Tensioner Replacement: |
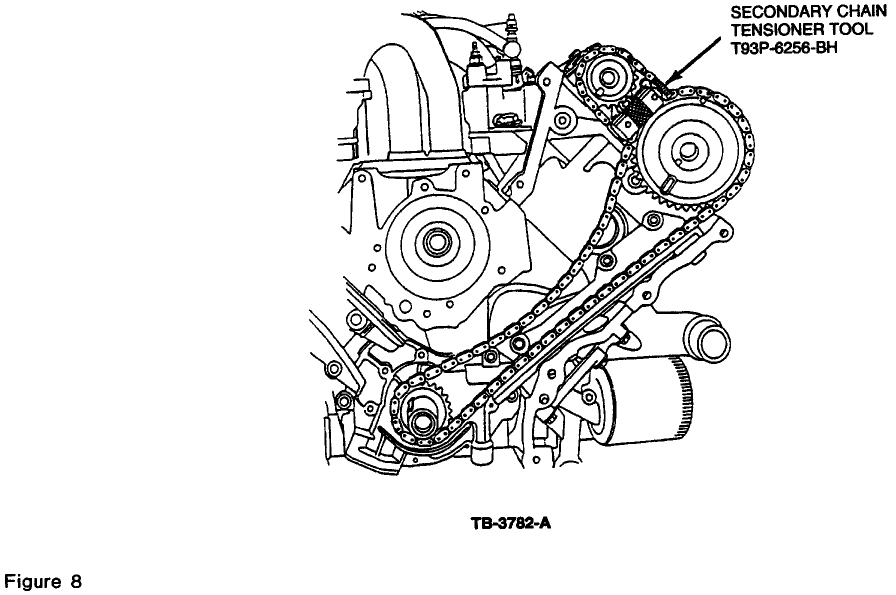 |
| a. | Insert the Tensioner Tool (T93P-6256-BH) between the upper and lower rubbing blocks of the LH secondary tensioner. Rotate the knob on the top of the tensioning tool until spring pressure is applied onto the tensioner and the knob on tool rotates freely (Figure 8). |
| b. | Install Camshaft Holding Tool (T93P-6256-AH) onto the machined centers of both the intake and exhaust camshafts on the LH side. |
| c. | Torque the four (4) clamping bolts on the Camshaft Holding Tool evenly to 15 lb-ft (20 N-m). |
| d. | Remove the spring-loaded tensioning tool from the LH secondary tensioner. |
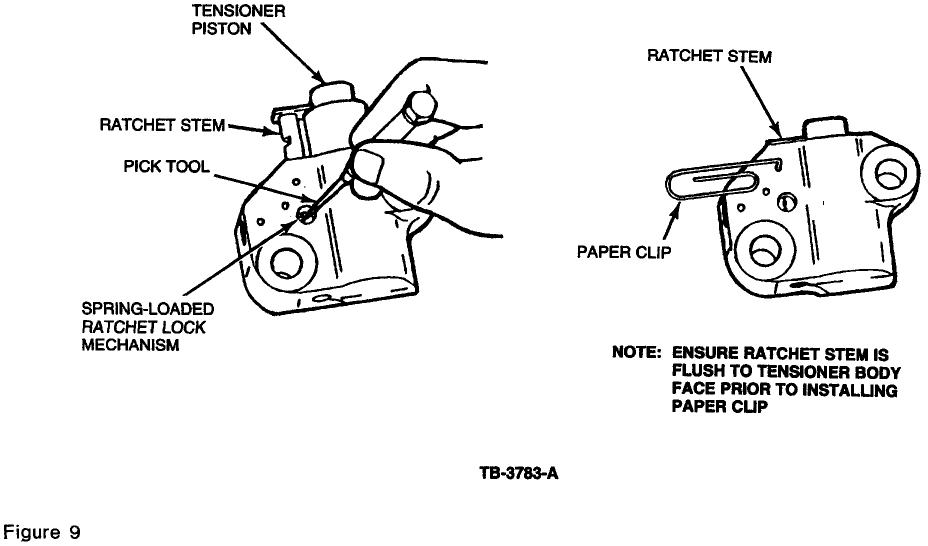 |
| e. | Unlock the LH Primary Tensioner Ratcheting Device (using a small pick or similar tool, hold ratchet lock mechanism away from ratchet stem, Figure 9). |
| f. | Slowly compress primary tensioner piston in small increments with minimal force (Figure 9). |
 |
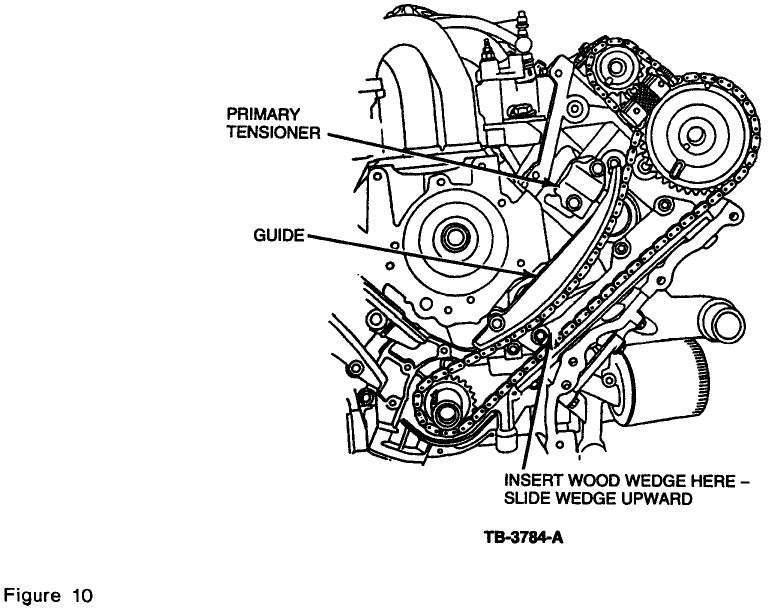 |
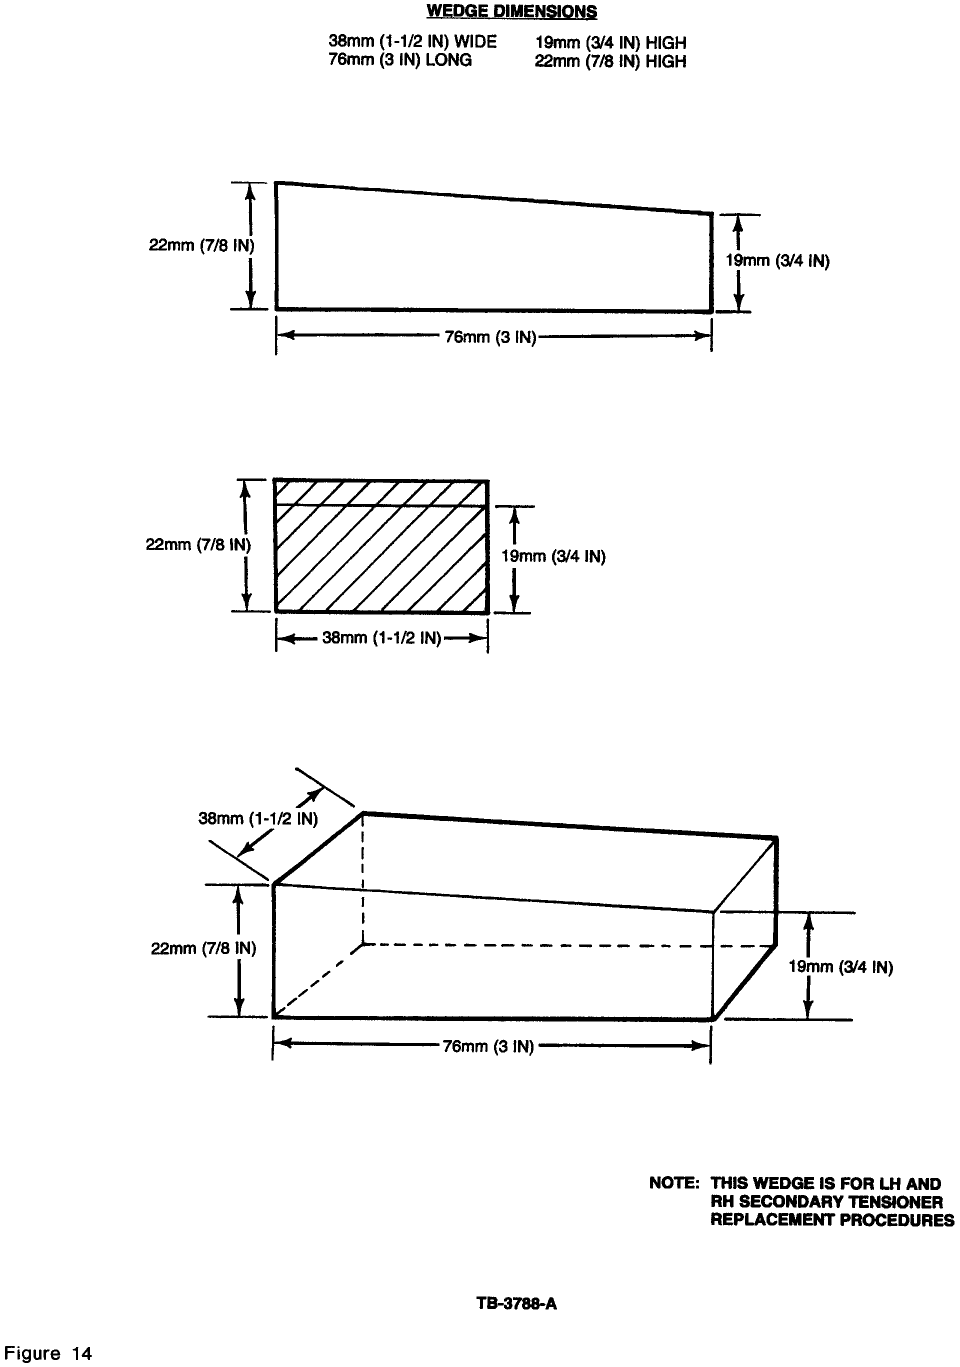
| h. | Insert the pre-made wooden wedge (Figure 14) as shown in Figure 10 to hold the primary timing chain in position. |
| i. | Using a breaker bar and socket (do not use power impact tools), smoothly loosen the intake cam timing sprocket bolt and remove the bolt, washer, and spacer. |
| j. | Using a breaker bar and socket (do not use power impact tools), smoothly loosen the primary timing chain sprocket bolt and remove the bolt and washer. |
| k. | Keep the timing chain on the sprocket and let the chain and sprocket hang to the side. |
| l. | Compress the secondary tensioner and remove the secondary sprockets and timing chain. |
| m. | Remove two (2) secondary tensioner attaching bolts and remove the tensioner assembly. |
| n. | Install new Secondary Cam Chain Tensioner (F5LY-6K254-B), torquing the two (2) attaching bolts to 6-9 lb.ft. (8-12 N-m). |
| o. | Reinstall secondary timing sprockets and chain with the hubs on the sprockets facing the cylinder head. |
| p. | Pull the locking pin from the new secondary tensioner. |
| q. | Reinstall the primary sprocket and chain, ensuring the paint mark on the timing chain is still next to the timing mark in the primary sprocket. |
| r. | Install the exhaust cam sprocket bolt and washer until snug and then loosen the bolt two (2) complete revolutions. |
| s. | Insert the Tensioner Tool (T93P-6256-BH) between the upper and lower rubbing blocks of the secondary tensioner. |
| t. | Rotate the knob on top of the tensioning tool until spring pressure is applied onto the tensioner and the knob on the tool rotates freely. |
| u. | Remove the wooden wedge from the primary timing chain. |
| v. | Pull the locking pin from the primary tensioner. |
| w. | Tighten and torque the exhaust cam sprocket bolt to 89-96 lb-ft (120-130 N-m). |
| x. | Tighten and torque the intake cam sprocket bolt to 89-96 lb-ft (120-130 N.m). |
| y. | Remove the tensioning tool from the LH secondary tensioner. |
| z. | Remove the Camshaft Holding Tool. |
| 10. | RH Secondary Tensioner Replacement: |
| a. | Insert the Tensioner Tool (T93P-6256-BH) between the upper and lower rubbing blocks of the RH secondary tensioner. Rotate the knob on the top of the tensioning tool until spring pressure is applied onto the tensioner and the knob on tool rotates freely (Figure 8). |
| b. | Install Camshaft Holding Tool (T93P-6256-AH) onto the machined centers of both the intake and exhaust camshafts on the RH side. |
| c. | Torque the four (4) clamping bolts on the Camshaft Holding Tool (T93P-6256-AH) evenly to 15 lb.ft. (20 N-m). |
| d. | Remove the spring-loaded tensioning tool from the RH secondary tensioner. |
| e. | Unlock the RH primary tensioner ratcheting device (using a small pick or similar tool, hold ratchet lock mechanism away from ratchet stem, Figure 9) |
| f. | Slowly compress primary tensioner piston in small increments with minimal force. |
| g. | Lock the primary tensioner ratcheting device with a small pin (e.g., paper clip) once the tensioner is fully compressed. |
| h. | Insert the pre-made wooden wedge (Figure 14) as shown in Figure 10 to hold the primary timing chain in position. |
| i. | Using a breaker bar and socket (do not use power impact tools), smoothly loosen the primary timing chain sprocket bolt and remove the bolt, washer, and spacer. |
| j. | Keep the timing chain on the sprocket and let the chain and sprocket hang to the side. |
| k. | Compress the secondary tensioner. |
| l. | Remove two (2) secondary tensioner attaching bolts and remove the tensioner assembly. |
| m. | Install new Secondary Cam Chain Tensioner (F5LY-6K254-A), torquing the two (2) attaching bolts to 6-9 lb-ft (8-12 N-m). |
| n. | Pull the locking pin from the new secondary tensioner. |
| 0. | Reinstall the primary sprocket and chain, ensuring the paint mark on the timing chain is still next to the timing mark in the primary sprocket. |
| p. | Install the exhaust cam sprocket bolt until snug and then loosen the bolt two (2) complete revolutions. |
| q. | Insert the Tensioner Tool (T93P-6256-BH) between the upper and lower rubbing blocks of the secondary tensioner. |
| r. | Rotate the knob on top of the tensioning tool until spring pressure is applied onto the tensioner and the knob on the tool rotates freely. |
| s. | Remove the wooden wedge from the primary timing chain. |
| t. | Pull the locking pin from the primary tensioner. |
| u. | Tighten and torque the exhaust cam sprocket bolt to 89-96 lb-ft (120-130 N-m). |
| v. | Remove the tensioning tool from the RH secondary tensioner. |
| w. | Remove the Camshaft Holding Tool. |
| x. | Remove crankshaft damper bolt and washer from crankshaft. |
| y. | Install ignition pulse sensor ring on crankshaft. |
Reassembly Procedure
| 1. | Engine Front Cover Installation:
|
| b. | Replace front cover gaskets. |
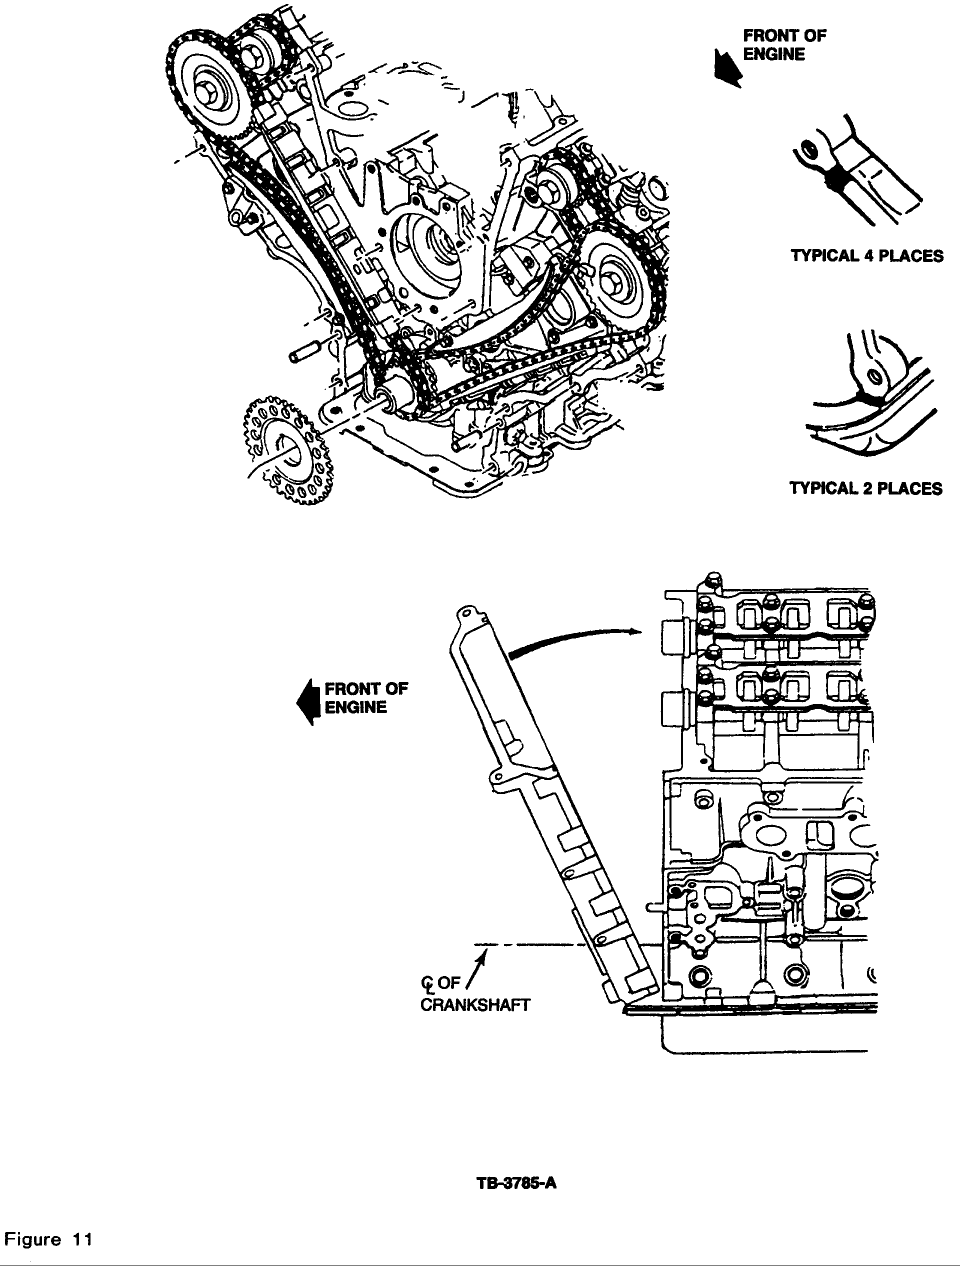 |
| c. | Apply RTV Silicone Gasket and Sealant (F1AZ-19562-A, or equivalent) in the six (6) locations shown in Figure 11. |
| d. | Install seven (7) studs and eight (8) bolts retaining the front cover to the engine. |
| e. | Torque, in sequence (Figure 12), the engine front cover bolts to 15-22 lb-ft (20-30 N-m). |
| f. | Install lower water pump bolt. |
| g. | Torque water pump bolt to 15-22 lb-ft (20-30 N-m). |
| h. | Connect crank position sensor. |
| i. | Apply RTV Silicone Gasket and Sealant (F1AZ-19562-A, or equivalent) in the keyway of the crankshaft damper pulley. |
| j. | Position damper pulley on crankshaft. Ensure key and keyway are lined up. |
| k. | Using Crankshaft Damper Replacer (T74P-6316-B), install the damper pulley. |
| l. | Install crankshaft damper pulley bolt and washer. |
| m. | Torque the crankshaft damper pulley bolt to 114-121 lb.ft. (155-165 N-m). |
| n. | Raise vehicle on hoist. |
| 0. | Install four (4) bolts retaining the oil pan to the front cover. |
| p. | Tighten the oil pan-to-front cover bolts to 15-22 lb.ft. (20-30 N-m). |
| q. | Position power steering pump on the engine. |
| r. | Tighten the power steering pump bolts to 15-22 lb.ft. (20-30 N-m). |
| 5. | Using Steering Pump Pulley Replacer (T91P-3A733-A), install power steering pump pulley. |
| t. | Lower vehicle. |
| 2. | Left Side Cam Cover Installation:
|
| f. | Install cam cover retaining bolts and studs. |
| g. | Torque cam cover bolts to 6-9 lb-ft (8-12 N-m). |
| 3. | Right Side Cam Cover Installation:
|
| e. | Install cam cover retaining bolts and studs. |
| f. | Torque cam cover bolts to 6-9 lb-ft (8-12 N-m). |