Upgrading
the 1-2 Accumulator and Changing to Mercon V
If you are seeing sluggish shifting, shift hunting between lower gears and
a very loud shudder noise during gear changes, you might want to consider a
1-2 accumulator upgrade and fluid change. The old piston has very small o-rings.
An OEM piston can rock in the bore and damage the accumulator walls, if left
too long. Common symptoms of a broken spring/worn piston include uneven shifting,
always extremely hard 1-2 shifts, or hunting. The shutter noise sounds like
you are driving on those "you are leaving the road" warning strips that they
put in the asphalt nowadays. The noise can be is very, very loud. The shudder
is caused by transmission fluid breakdown. There is a TSB (Technical Service
Bulletin) about both the accumulator piston (hard 1-2 shifts, confused shifts,
hunting) and the transmission fluid change (shudder). The new piston and seal
has much wider, tougher o-rings. If the refresh is left undone, your transmission
could be damaged beyond simple repair - professionals are going to have to fix
it for you and that cost big bucks.
If your Mark or Cougar is not showing the symptoms, it's still a good idea
to at least check to see if your transmission has the old accumulator parts,
change out the filter and totally drain the old Mercon III and install the suggested
Mercon V fluid. Your next transmission project will be to add on an aftermarket
transmission cooler. But that is a different article. For now, here are a few
notes on a step by step, if anybody is interested in doing it himself (or herself
if we have any ladies that like getting down and dirty..)
1. Getting ready to do the repair.
a. The parts you will need are listed below:
i. F7AZ-7F251-AA Updated Accumulator Piston - Retail Cost $12.00 (Don't
use your old one - that is the whole point of this work you are about to
do.)
ii. F4AZ-7F247-A 1-2 Cover and Seal - Retail Cost $3.42. This part may
be optional if you find a new one already installed. The Cougar had a "new"
cover and seal, but an "old" accumulator piston.
iii. F75Z-7F284-AA Upper (Blue) Spring - Retail Cost $3.25. This part is
optional. You may be able to use your old spring here. We had one transmission
that was completely missing an upper spring (it was in a Cougar.)
iv. F7AZ-7F284-BA Lower (purple) spring - Retail Cost $32.50. This part
is optional. As you can see, this is a high cost item. You may be able to
use your old spring. One transmission we did in a 94 Mark VIII had this
spring broken in two places. There is a picture of these old parts below.
v. Twelve or thirteen quarts of Mercon V or Mercon III - Retail Cost $30.00
to $40.00. We strongly suggest you use the Mercon V. It handles the heat
better.
vi. Transmission Filter - Retail Cost $5.00 to 10.00. If you are converting
over to Mercon V, replacing the filter is good practice, since you are trying
to drain the entire transmission of the old stuff. Auto Zone sells a house
brand that comes with a cork gasket. O'Rielly sells a filter that has a
neoprene gasket. I prefer the O'Rielly filter to the Auto Zone; simply because
of the gasket type makes for easier assembly. Both filters are USA made
and seem to be high quality. Make sure the gasket is still in the filter
box - sometimes parts houses "borrow" the cover gasket and forget to return
the filter to the "missing parts" shelf.
b. The tools you will need are:
i. Seven to nine inch (from tip to handle end) Internal Snap Ring Pliers.
These pliers will compress the ring as you squeeze the handle. The internal
snap ring you will come up against fits inside of a two-inch diameter bore.
The tips for the pliers should be no larger than 0.09 inches in diameter.
Your little 5 inch pliers that you got from Auto Zone or from O'Rielly isn't
gonna have the muscle to remove the ring. HOTLNC found a high quality internal/external
snap ring tool at NAPA, under their NAPA Service Tools line. It's a 10-inch
tool with many different sized tips. The good news is that it is guarantied
forever. The bad news is it cost 69 bucks after taxes. MAPLES 8 showed good,
down to earth common sense and modified a pair of large needle nose pliers.
He ground down the tips to more or less the right size for the ring hole
and applied it to the snap ring. Works good and lasts a long time.
ii. 10mm and 12mm sockets, ¼ or 3/8 inch ratchet drive, with extensions
and optional screw-driver handle.
iii. Inch-pound and foot pound torque wrenches
iv. 24mm (must check size) socket, ½ inch ratchet drive or breaker bar.
v. A waste oil container that can hold at least 2 gallons of fluid. The
transmission cover will have about a gallon in it and the torque converter
will contain the remaining fluid.
vi. A long necked fill tube/funnel (transmission fill funnel)
vii. Plenty of show towels or old rags. It's gonna be raining fluid real
soon.
viii. Small scissor jack or hydraulic jack
ix. Jack stands, floor jack or wheel ramps (preferred)
2. Open trunk and turn off the air ride switch.
3. Pull the car up on wheel ramps, or jack it up high enough so that you can
crawl under the car. If you jack it up, please use jack stands. Do not depend
on the jack to support the weight of the car.
4. Get under the car and start loosing the rear bolts on the transmission cover.
Remove all bolts except for the two along the front of the cover. As you remove
the rear bolts you will start to see leakage. It will drain faster if you leave
the rear wheels down on the ground for the drain operation. Once the fluid has
more or less stopped flowing, push the cover back up against the transmission
and remove the remaining two screws. A third hand would help. A small scissor
or hydraulic jack can also be used to hold the pan up against the transmission
while the bolts are removed. Then carefully remove the jack and dump the cover
full of fluid into your waste oil container. It's going to rain fluid for a
while after the cover is off, so be prepared for it.
5. The 1-2 accumulator is on the forward, driver's side of the transmission.
There is a round area cast into the transmission body.
a. To make the snap ring easier to remove, HOTLNC used a 5-inch C clamp to
slightly compress the accumulator seal. He put the moveable end of the clamp
on the accumulator seal. This tool relieves accumulator spring tension on
the snap ring. He then used the pliers on the ring and removed the ring.
b. Maples 8 used a small jack to press in the piston. We noted in some applications
(A 95 Cougar for example) using a C-clamp is impossible due to the interference
of the exhaust plumbing.
c. If you do not use the C clamp or jack, you are going to have to hold the
accumulator seal in while removing the ring. You will be fighting two powerful
springs and they will eventually win.
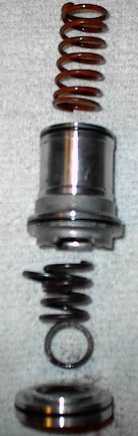
6. The above picture shows the components that HOTLNC removed from his daughter's
Mark VIII. From the left, you have the upper (blue) spring. The accumulator
piston. The lower spring (purple color) and then the seal. Notice that old lower
spring is broken into three pieces. This car had very loud shutter symptoms.
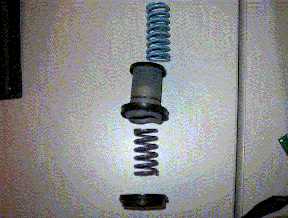
7. The above picture shows the replacement parts in the same order. The piston
and the seal are made completely different when compared to the OEM parts. Springs
are springs. Depending on your pocketbook size and the lack of damage to your
old springs, you may not need to buy replacements. Only the piston and seal
need be upgraded.
8. Install the new accumulator parts.
a. Clean out the accumulator chamber and check for gouges (with that broken
spring this worried us. But only the bottom of the piston and the top of the
seal were beat up - the walls were OK.)
b. Coat the piston's seals with clean fluid and install the blue (upper)
spring into the piston.
c. Push the piston/spring assembly into the chamber, making sure the piston
can compress the spring. This action may squirt fluid at you.
d. Coat the seal with fluid and install the purple (lower) spring into the
round depression built into the seal. Push this assembly into the chamber.
e. You might want to use your C clamp (or jack) to hold the seal into the
hole, as these could be new springs and are much stronger than the old ones.
f. Now install the snap ring. Before removing the C clamp, make sure the
snap ring is completely seated in the accumulator wall slot.
g. Remove the C clamp and insure the seal rests against the snap ring all
the way around the contact area.
9. If you are going to drain the torque converter, now is the time to do it.
a. Remove the rubber plug from the inspection hole at the bottom of the converter
cover. It is located just forward of the transmission body that is still dripping
fluid on you or the floor. Looking inside you should see the round surface
of the torque converter.
b. Using the large socket and ½ inch breaker/ratchet, mount the socket on
the drive pulley bolt and turn the motor by hand. Turn slowly, as you are
moving pistons up and down. If you feel motor compression fighting you, stop
and let the air bleed off. You are looking for a 12mm bolt head protruding
from the center of the converter.
c. Center the bolt head in the inspection opening. Position the waste oil
container under the inspection hole and remove the bolt. It is quite short
and very tight.
d. There may be two gallons of fluid inside the converter - make sure your
waste oil container can handle that amount.
10. While the converter is draining, remove the old gasket from the transmission
cover and clean the cover. Look inside the aft end of the cover and find the
round magnet. It is not mechanically attached to the pan, just stuck there due
to magnetism. Remove it and inspect it for metal filings. The magnet inside
the pan may have a thick coating of black powder-like substance. Don't worry,
it will clean up well. You can clean the outside of the cover with kerosene,
brake cleaner or even carburetor cleaner if you have that.
11. Replace the magnet and position the new cover gasket on the cover. Clean
off all of the cover bolts. If the gasket is rubber or neoprene, you can "pin"
the new gasket to the cover using the bolts. The bolt holes in the gasket are
smaller than the bolts, so the bolts are held in place quite securely. If the
new gasket is cork, the bolt holes in the gasket are too large to hold the bolts.
Position the gasket around the cover. Do not use "Make-A-Gasket" or silicone
sealer. Such sealants are not needed here.
12. When the converter stops dripping, install the converter drain bolt into
the drain hole and tighten. Tighten the plug to 21 to 23 foot-pounds. Wipe up
any fluid that has collected inside the converter cover and replace the rubber
plug. Make sure you get the fluid out of here, or you will be forever worried
that your converter plug is leaking.
13. We suggest you check the torque on all main control valve body bolts. Set
your torque wrench to 80 inch pounds and check each bolt to insure it is at
least this tight. The specification call for 80 to 100 inch pounds. There are
four or five bolts that are bigger than 10mm.
14. Install the new filter into the transmission.
a. Look inside the filter's install hole and see if the old filter's grommet
is still inside. They can get hard from the heat and you might find one "heat
staked" in place.
b. Lightly coat the new filter's grommet with axle grease.
c. Install the new filter into the hole and push it gently up as far as it
will go.
d. Align the filter's body edge with the transmission case and make sure
it is sitting more or less parallel with the valve body.
e. Warning: Once you install the filter, avoid removing it. Once removed
and re-installed, the grommet may not have enough "spring" left in it to hold
the filter in its position. You may end up having to buy another filter!
15. Double check that the cover gasket surface is clean and that the mating
surface of the transmission is likewise free of dirt.
a. Install the cover with the pined gasket to the bottom of the transmission
using the cover bolts. Tighten all bolts a few turns just to keep the pan
from falling down.
b. If you have the cork gasket, install one corner bolt and match up the
cover to the bottom of the transmission. Start that first bolt a couple of
threads and go to the opposite corner and add another bolt, being careful
to capture the gasket. Keep all the bolts as loose as you can until to have
installed all bolts into the pan. Having the pan just hanging on the loose
bolts will make it easy for you to determine if the many bolts are nailing
the gasket. Make sure each bolt has been inserted into the gasket holes. It
is very easy to push the gasket too far inside the case and miss pining it
entirely.
16. Push the cover up against the transmission and hand tighten the bolts until
the cover is fitted to the bottom of the transmission. Using a wrench, or a
socket driver, lightly snug up all bolts. Using a torque wrench, tighten all
bolts in an X pattern in three stages. This tightening procedure may seem like
over-kill. But the bolts holding the pan are installed with very low torque.
If you have any bolts too tight or too loose, that is the location of a future
leak.
a. Stage one - torque all bolts to 30 to 40 inch pounds, using X pattern.
b. Stage two - torque all bolts to 80 to 100 inch-pounds, using X pattern
c. Stage three - re-check the torque on all bolts. You are checking for a
value between 80 to 100 inch-pounds. Divert from the X pattern here and just
go round robin, starting at the center front bolt.
17. Open the hood and remove the transmission dipstick. You will find it against
the starboard firewall, slightly lower than the air conditioner hoses. Install
the fill funnel tube into the top of the transmission fill tube. Did you check
the funnel's insides for dirt, dust and grime? If it ain't finger-licking clean,
all that crap is going into your transmission along with that expensive Mercon
V. Once you have a clean fill tube, start pouring in the Mercon V.
a. We suggest that you pour in half of what was pulled out with the motor
off. Then jack up the rear wheels, install jack stands and start the motor.
Run through all the positions on the shift lever, taking the time to allow
the fluid to activate the position selected. One or both rear wheels may spin.
b. Stop the motor and pour the remaining fluid into the transmission while
it is sitting there. Put in as much as you took out.
c. Start the motor again and run through the gears again. Allow to idle for
a few minutes and then check for leaks. Shut it down.
18. Drop the car back on the ground. Clean up, get in and cycle the shift lever
through all the gears. Take the car for a test drive. Drive it for about 20
miles, or enough to warm up the fluid. It should be smooth as glass and no there
should be no shutter.
19. Back home, on a level surface, Keep the motor running and check the fluid
level. It should show HOT FULL. If not add fluid in ½ pint increments until
it does show the proper level.
20. We are done.
References:
1. Author's and Editor's personal experience with their Mark VIII
2. Question and replies on www.markviii.org conference areas
3. Lincolns Of Distinction, Mark VIII Club, Technical area, "Parts for Accumulator
Piston Repair for 1993 to 1997 Mark VIII's"
4. Ford Mark VIII 1994 Service Manual, (c)1993 Ford Motor Company
5. Ford Mercury Cougar 1995 Service Manual, (c)1994 Ford Motor Company
Submitted by:
Author: Jerry Heep (HOTLNC) jjheep@swbell.net
Technical Editor: Woodie Maples (MAPLES 8) maples@lelindsayconst.com
Return to Technical Help